Printable Address Book - EZ Address Book Software
| Home | Features and FAQ | Order and Download | Testimonials | FREE Trial | Watch Demos |
|
EZ Home and Office Address Book
v10.0
$29.95
Home >
Features >
Address Book
|

EZ Address Book Lookup and Entry Screen
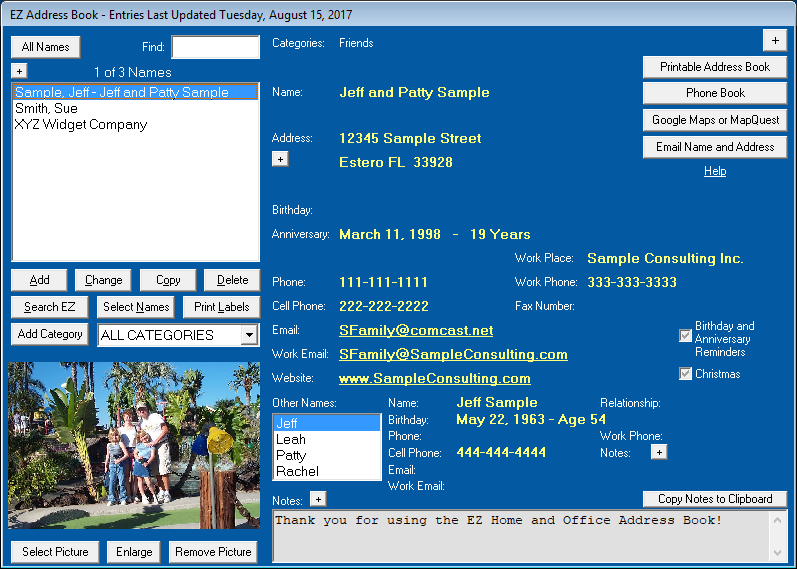
Clickon the toolbar or select 'EZ Address Book' from the Features Menu to display and update the address book database. Select 'Open Database' from the File Menu to add or select another database. Any number of databases can be added. You could use one for home and one for business. You can also select a database from the drop-down list on the toolbar. Databases cannot be merged so consider using categories instead of multiple databases. You can select a startup category in Options on the Tools Menu. The program will either sort by First Name or Last Name depending on your selection in Options. Click the "+" or "-" button at the top right corner of the screen to change the height of the screen.
Click 'Add, 'Change', 'Copy', or 'Delete' to make changes to the address book. Enter one or more letters in the 'Find' text box to help locate a name on the list. Click 'Search EZ' to search for names in the address book. To redisplay all names after a search, click 'All Names' at the top of the screen or select 'ALL CATEGORIES' from the category drop-down list. Click 'Select Names' to select a subset of the names listed. Click 'Print Labels' to display and print labels. Click 'Add Category' to add, change, and delete categories. Any number of categories can be added. Select from the category drop-down list to show names for a specific category. You could add a category named "Christmas" or "Anniversary Party" and then add names to it for easy display in the EZ Address Book and for printing labels. Click the "+" or "-" button at the top left corner of the screen to change the height of the name list. Place the cursor over the name on the right side of the screen to show when the name was Last Updated or Added.
Click 'Select Picture' to display a picture for the selected name. A picture can be selected from anywhere on the computer and will be copied to the EZ Pictures Directory where all pictures in the EZ Address Book are stored. Click 'Enlarge' to pop up a larger picture. Click 'Remove Picture' to not show a picture for the selected name. The picture will not be deleted from the EZ Pictures Directory.
On the calendar you can click on an underlined date to display reminders for that day.
Click 'Printable Address Book' or 'Phone Book' for printable formats. Click 'Google Maps or MapQuest' to display an address map on the Internet. You must be connected to the Internet. Click 'Email Name and Address' to start an email (or copy to Windows Clipboard) that includes the name and address for the selected name or all names listed. Sending an email works with Outlook and other non-web clients. It does not work with web-based services like Gmail.
Check 'Birthday and Anniversary Reminders' if you want the program to display the name when the program starts if the birthday or anniversary is within the day range set in Options. The default value for the checkbox when adding a name can be changed in Options. Consider adding EZ Home and Office to your Windows Startup folder so when you start your computer EZ will start and show the Birthday and Anniversary Reminders. See Windows Help on how to add a program to the Startup folder. EZ also has a Birthday and Anniversary Calendar, a Printable Birthday and Anniversary Calendar, and a Birthdays and Anniversaries printable report. Choose Select Names for Birthday Reminders from the Tools Menu to check/uncheck more than one name at a time.
Check 'Christmas' to mark the names you want for easy display and label printing. To print Christmas labels, click 'Search EZ' and search for 'Christmas Only' names and then click 'Print Labels'. It's that easy. You could also add names to a category named "Christmas" to accomplish the same thing. There's also a 'Christmas' button on the Select Names for Labels and Envelopes Screen. "Christmas" can be renamed for other special occasions or removed in Options. Choose 'Select Names for Christmas' from the Tools Menu to check/uncheck more than one name at a time.
Clickbelow 'Address:' to select a different address for the selected name. Any number of addresses can be added for a name. Only the selected address will appear throughout the program including on labels. Many people own a summer home and winter home and this is an easy way to switch between addresses. Click
Click on a displayed email address to start an email or copy the email address to the Windows Clipboard. Click on a displayed website address to display the web page.
Phone, Cell Phone, Work Phone, and Work Place can be renamed in Options. You can also change the screen colors and customize the program in Options.
Select 'Delete Database Records' from the Tools Menu to delete the sample data that comes with the program.
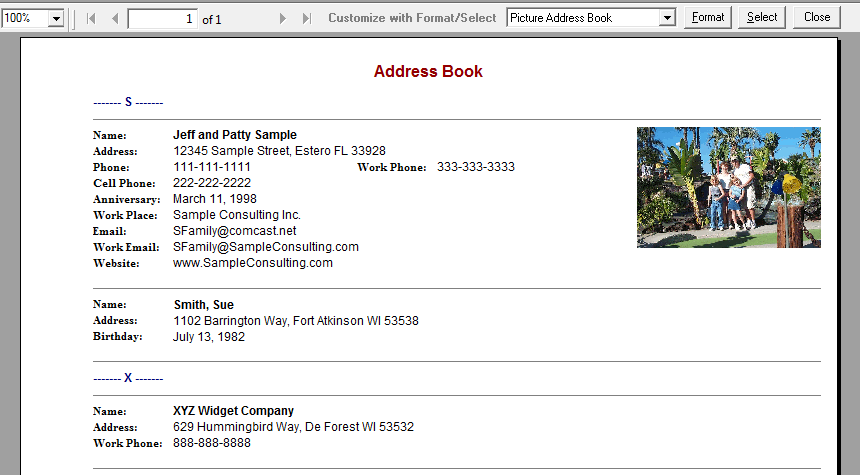
Picture Address Book
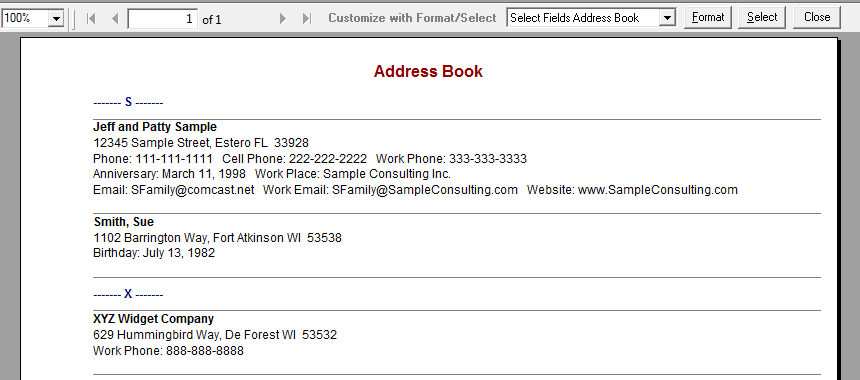
Select Fields Address Book
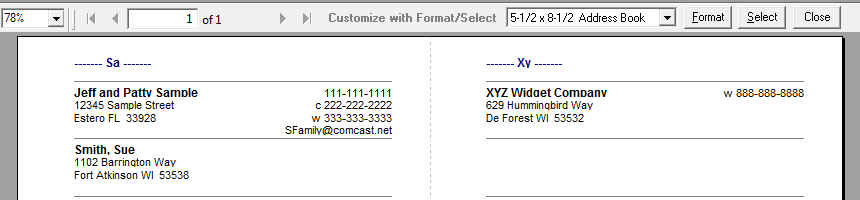
5 1/2" x 8 1/2" Address Book
Click
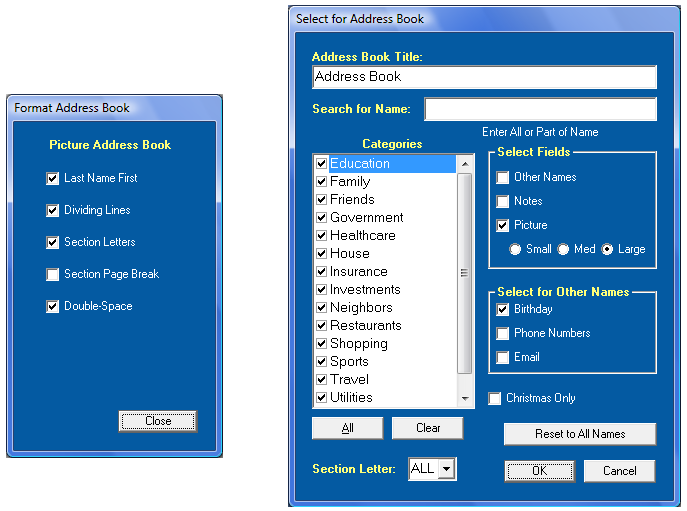
on the toolbar, select 'Printable Address Book' from the Features Menu, or click 'Printable Address Book' on the EZ Address Book Screen to display the address book in a printable format. There are 3 address book formats you can select from the drop-down list. To CUSTOMIZE THE REPORT, click 'Format' to select formatting options and click 'Select' to choose the names and fields for the report. All address book formats are indented for punch holes.
Picture Address Book - All fields from the EZ Address Book can be displayed including a picture. There are 3 different picture sizes that can be displayed (click the 'Select' button).
Select Fields Address Book - All fields in the EZ Address Book can be displayed except pictures. Select the fields you want on the report (click the 'Select' button).
5-1/2 x 8-1/2 Address Book - This address book format displays and prints two 5-1/2 x 8-1/2 pages per sheet. The name, address, phone numbers, and email address are displayed. Only one email address is displayed and 'Email' takes precedence over 'Work Email'.
Clickon the toolbar, use Ctrl+P, or select 'Print' from the File Menu to print the report.
Clickon the toolbar or select 'Export Report' from the File Menu to export the report. There are many export formats including the Adobe Acrobat Format (PDF). We recommend the PDF format.
Select 'Options' from the Tools Menu to change the report colors, set the default zoom, and select whether you want to display the current date and/or page number at the bottom of the report. All reports use the same options.
Format and Select for Picture Address Book
ElwoodSoftware.com has a Shopper Approved Rating of 4.9 out of 5 based on 718 Ratings and Reviews
Copyright © 2023 Elwood Software.
All Rights Reserved.
Your Privacy is Always Protected.
Elwood Software, 21539 Brixham Run Loop, Estero, FL 33928
Support@ElwoodSoftware.com